 Single Faucet Kegerator Beer Dispensers
 Dual Faucet Two Tap Kegerators
 Triple Faucet Three Tap Kegerators
 Undercounter Built-In Kegerators
 Outdoor Kegerator Beer Dispensers
 Commercial Kegerators
 Mini Kegerators
 Cold Brew & Nitro Coffee Dispenser Kegerators
 Carbonated Water Kegerators
 Home Brew Kegerators
 15" Kegerators
 Kombucha Equipment
 Guinness® Dispensing Kegerators
 Vending Kegerators
 Wine Kegerators
 Kegerator Cabinets
 Kegerator Covers and Accessories
 Kegerators
 Kegerator Conversion Kits
 Kegs & Keg Accessories
 Beer Faucets
 Beer Shanks
 Draft Beer Towers
 Keg Taps Couplers
 Regulators & Gas Equipment
 Beer & Gas Line Hose
 Co2 and Nitrogen Air Tanks
 Beer Line Cleaning Equipment
 Drip Trays
 System Fittings
 Jockey Boxes
 Keg Beer Party Pumps
 Glassware & Accessories
 Guinness® Dispensing Equipment
 Remote Glycol Systems
 Wine Cooler Refrigerators
 Wine Cellar Cabinets
 Wine Racks
 Cooling Units
 Wine Dispensing Systems
 Wine Glasses
 Wine Accessories
 Howard Miller Wine & Spirits Furniture
 Wine Making
 Nitro Hot Draft System
 Ready to Drink Bag-in-a-Box Coffee Dispensing Equipment
 Nitrogen Infusers
 Nitrogen Tanks & Generators
 Nitrogen Beer Regulators
 Nitro Cold Brew Coffee Kegs
 Cold Brewed Coffee Tools
 Espresso Machines
 Cleaning Equipment
 Outdoor Appliances
 ADA Appliances
 Panel Ready Appliances
 Commercial Grade Appliances
 Beverage Centers
 Refrigerators
 Drawer Refrigerators
 Ice Makers
 Water Dispensers & Accessories
 Freezers
 Home Brew Equipment Kits
 Fermentation Equipment
 Boiling and Mashing Equipment
 Home Brew Beer Kegs
 Home Brew Kegerator Conversion Kits
 Brewing Tools
 Home Brew Ingredients
 Cleaning Chemicals
 Test Equipment
 Home Brew Beer Bottles and Bottling Equipment
 Brewery Fittings
 Draft Beer Equipment
 Homebrewing Equipment
 Wine Equipment
 Luxury Appliances and Refrigeration
 Coffee Equipment
 Kombucha
 The Beverage Blog
 Frequently Asked Beer Questions
 Shop by Brand
 Shop by Category
How to Build a Kegerator
Refrigerator Conversion Kit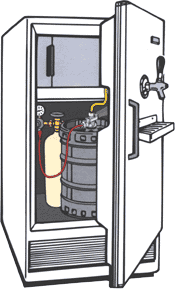 Q: What size keg will fit into my refrigerator?
Approximate measurements required to tap most kegs:
Check with your local beer wholesaler or retailer to verify actual keg sizes, including tap heights.
Q. Can my refrigerator maintain temperatures between 34°-38° Fahrenheight?
Draft beer is pasteurized, so it must be kept cold preferably 38°. Temperatures above 38° may cause the beer to become wild, turn sour, and cloudy. Draught beer should be consumed within 30-45 days, as it is not pasteurized and loses its original brewery fresh taste and aroma the older it gets.
Q. How much beer are in a Keg?
There are two keg sizes: the quarter barrel containing 7-3/4 gallons or approximately 3-1/2 cases of 12 ounce bottles or cans; the half barrel containing 15-1/2 gallons or approximately 7 cases.
Q. What tools will I need?
- 1/4" Electric Hand Drill
- 1/8" Drill Bit
- 1/4" Drill Bit, with long enough shank to reach through the refrigerator walls
- 1 1/8" Hole Saw
- Center Punch or a Nail
- Crescent Wrench, large enough to tighten a 1-1/8" lock nut
- Standard Screwdriver
- Hacksaw
- Measuring Tape
Q. How do I assemble the conversion kit?

Step 1: Drill Holes
- Using the 1/4" bit, drill through the outer wall and into the inner wall. In this step, it is essential that the drill and the bit be held exactly horizontal to the floor, otherwise the faucet and shank will not be level.
- Next, drill the outer wall within the 1-1/8" hole saw, and then drill the inside wall to provide a 1-1/8" hole through the refrigerator.
- From the center line of the faucet hole, measure down approximately 10" and draw a line parallel to the floor. Center the drip tray (if you purchased one) holder under the faucet and alone the line. Mark the holes in the holder on the outer wall and drill with the 1/8" bit. Attach the holder with two of the sheet metal screws provided.
Step 2: Assemble and Connect Parts
 Screw the black faucet knob onto the faucet
 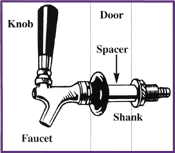 Attach faucet and shank to refrigerator door.
 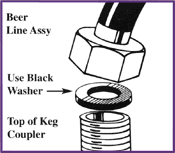 Attach beer line to shank using a furnished clamp. Attach the other end of beer line with hex nut to keg coupler.
 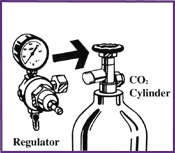 Fasten the CO2 regulator to the CO2 tank, tightening the CO2 nut securely. Do not over tighten; over tightening may damage washer in stem of regulator
 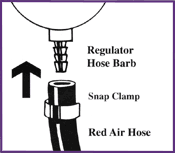 Attach one end of the air hose to the hose barb on the CO2 regulator, using one of the two snap clamps provided. (Use pliers to snap the clamp tight to assure that there is no gas leak.)
 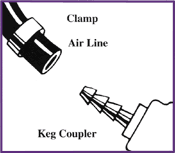 Place the CO2 cylinder and regulator inside one of the corners of the refrigerator. It is important that the cylinder be kept in an upright position to operate efficiently, using a chain or heavy cord if a wire rack is not provided.
 Fasten the other end of the red air line to the keg coupler using the remaining snap clamp.